


FREE Standard Shipping on Orders $69+ with code:
FREESHIPPING

 Give a Cheer
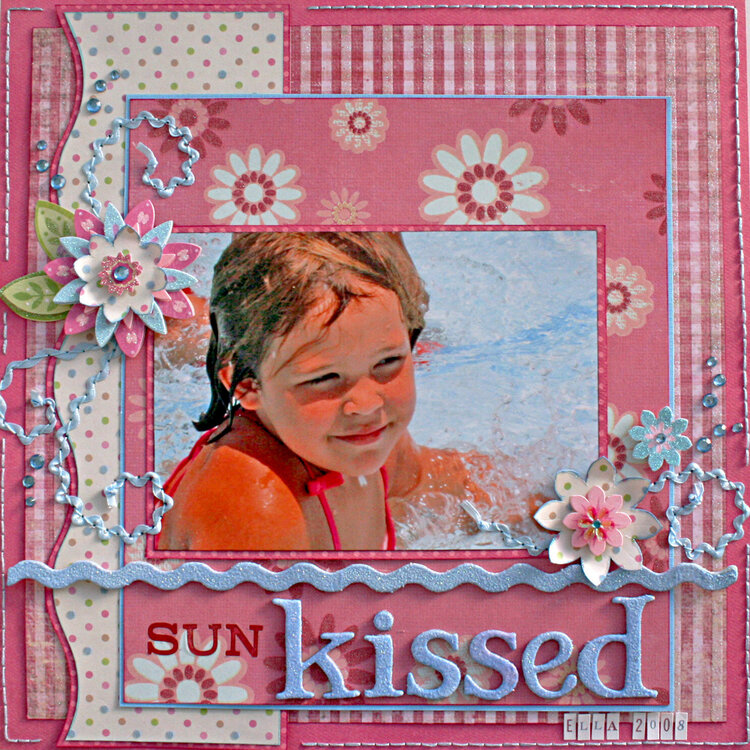
This is my sweet great niece Ella. I did this layout for the Flourish Series in Scrapbooking and Beyond Magazine. So excited!
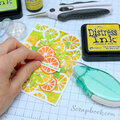
When planning this layout, I wanted to add waves. I chose to use my stitched flourishes to give a wavey touch by stitching ribbon under the stitches. This was a very simple technique, although it takes a bit longer to do than just stitching.
To guarantee the stitches be exactly where I wanted them, I first drew them on a piece of transparency. I then placed the transparency over the page to choose the placement. To punch the holes in the page for easier stitching, I left the transparency in place and punched holes right through the transparency and the paper.
To add the ribbon to the stitching, I simply tucked the ribbon under each stitch as I went. It is easiest to start at the end of the flourish with a knot already in your ribbon. When you get to the end, you can either add another knot, or if it is going to be hidden under another embellishment you can just trim the ribbon. Leave an inch or so of ribbon to make sure that your ribbon doesnt come undone. There is no need to add glue to the ribbon. Your stitches will easily hold it in place.
Hint- If your ribbon is stiff and not laying smoothly, simply give it a couple of gentle tugs before you start. It will loosen it up and make it easier to use.
Thanks for looking!


Thanks for spreading positivity!


March 15, 2010
October 10, 2009
October 06, 2009
August 20, 2009
August 20, 2009
August 04, 2009
August 04, 2009
July 29, 2009
July 29, 2009
July 23, 2009
July 23, 2009
July 22, 2009
July 22, 2009
July 20, 2009
July 13, 2009
July 13, 2009
July 11, 2009
July 08, 2009
July 06, 2009
July 06, 2009
July 05, 2009
July 04, 2009
July 04, 2009
July 02, 2009
July 02, 2009
July 02, 2009
July 02, 2009
July 01, 2009
July 01, 2009
July 01, 2009
July 01, 2009
July 01, 2009
July 01, 2009
July 01, 2009
July 01, 2009
July 01, 2009
July 01, 2009
July 01, 2009
July 01, 2009
July 01, 2009
July 01, 2009
July 01, 2009
July 01, 2009
July 01, 2009
July 01, 2009
July 01, 2009
July 01, 2009
July 01, 2009
July 01, 2009
July 01, 2009
July 01, 2009
June 30, 2009
June 30, 2009
June 30, 2009
June 30, 2009
June 30, 2009
June 30, 2009
June 30, 2009
June 30, 2009
June 30, 2009
June 30, 2009
June 30, 2009
June 30, 2009
June 30, 2009
June 30, 2009
June 30, 2009
June 30, 2009
June 30, 2009
June 30, 2009
June 30, 2009
June 30, 2009
June 30, 2009
June 30, 2009
June 30, 2009
June 30, 2009
June 30, 2009
June 30, 2009
June 30, 2009
June 30, 2009
June 30, 2009
June 30, 2009
June 30, 2009
June 30, 2009
June 30, 2009
June 30, 2009