Thank YOU! It's Customer Appreciation Week!
EXTRA 11% OFF Orders $100+ With Code: THANKYOU
EXTRA 11% OFF Orders $100+ With Code: THANKYOU

 Give a Cheer
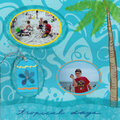
NEW TECHNIQUE!
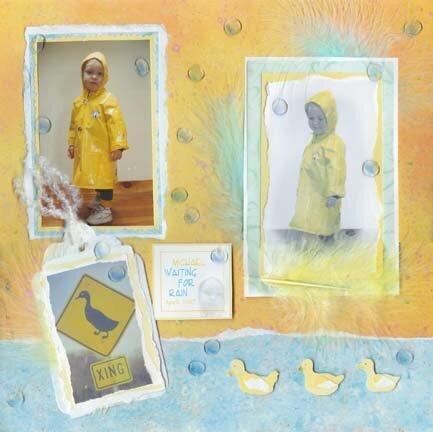
Making realistic rain drops!
This is a photo of my nephew, Michael, when he was small. He got a shiny new rain coat and couldn't wait to go outside and try it out. He was waiting so patiently for rain! Oh to be a child again and be amazed at something as simple as rain.
I started the layout with a sheet of NRN Burnt Umber Speckle background paper with a piece of NRN Water Speckle torn and placed across the bottom. I scanned the photos and printed one of them black and white and then lightly colored in his rain coat with a ZIG PHOTO TWIN soft yellow marker. Lots of torn edges add softness to the page. I wanted to create the feeling of a gentle rain for this layout. I added feathers for more soft texture. I printed a photo of a real Duck Crossing sign and tore the edges to match and placed it on a tag. Little duck paper piecings at the bottom add whimsy. I printed my journaling using ENVOY THIN font on top of a light close up of one of his photos as the background. I also used Fiskars Cotton Candy scissors, Adornments white fibers and Jill's Paper Doll World yellow cardstock.
How did I get those rain drops to look so real??? Neat trick I came up with! I placed ZOTS clear adhesive dots on the page and lightly dabbed ZIG blue marker ink with my finger on them! This not only gave them a touch of color, but it reduced the stickiness. I dabbed them again with a little baby powder and this reduced the stickiness even more, and allowed me to get it into a page protector where they will stay protected.
No products have been added to this project.


Thanks for spreading positivity!


January 28, 2004
October 29, 2003
October 01, 2003
October 01, 2003
September 30, 2003
September 30, 2003
September 30, 2003
September 30, 2003
September 29, 2003
September 29, 2003
September 29, 2003
September 29, 2003
September 29, 2003
September 29, 2003
September 29, 2003