


Livestream Party!
Join us today at 9:00am PT / 12:00pm ET | Details Here.
Join us today at 9:00am PT / 12:00pm ET | Details Here.

 Give a Cheer
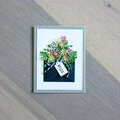
These chipboard layouts are my first attempt at screwing up the distressing technique...and I didn't disappoint. I've not used raw chipboard before and figured I needed to seal it so the finish didn't absorb into the board. Seemed logical. Yes? Wrong...After sealing the chiipboard I sprayed it with metal old gold finish, then I tried distressing it. HA! Everything I tried, stamping, antiquing, inking etc, smeared and would not dry. At least most of it washed off! You can still see traces of it on the background chipboard. Finally, I ended up drawing the black flourishes on the scalloped frames, with a 'stick on anything' Sharpie pen. However, after tearing out what little hair I've left, I am pleased with the results. I made the roses using Gabriella's tutorial on her blog. I modified them by scalloping the hearts and adding lightweight pink mulberry papers for a two-toned effect. And a little bling for extra PoP. Somehow, I managed to distress the small frames through trial and error and the white swirls are from the new StoryBook Cricut cartridge. And, of course, the pictures are my granddaughter, Julena. I also glittered the title letters...they kept getting lost in the whole scheme of things!


Thanks for spreading positivity!


July 21, 2010
July 21, 2010
April 14, 2010
April 08, 2010
November 16, 2009
October 09, 2009
October 08, 2009
October 05, 2009
October 02, 2009
October 02, 2009
October 02, 2009
October 02, 2009
September 30, 2009
September 29, 2009
September 28, 2009
September 28, 2009
September 28, 2009
September 28, 2009
September 28, 2009
September 28, 2009
September 28, 2009
September 28, 2009
September 28, 2009
September 28, 2009
September 28, 2009
September 28, 2009
September 27, 2009
September 27, 2009
September 27, 2009
September 27, 2009
September 27, 2009
September 27, 2009
September 27, 2009
September 27, 2009
September 27, 2009
September 27, 2009
September 27, 2009