Thank YOU! It's Customer Appreciation Week!
EXTRA 11% OFF Orders $100+ With Code: THANKYOU
EXTRA 11% OFF Orders $100+ With Code: THANKYOU

 Give a Cheer
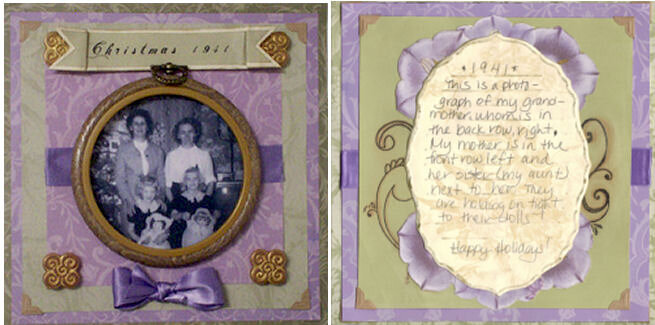
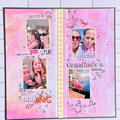
This is a photo of my grandmother, in the back right side. My mother is on the left and her sister on the right.
Materials: For left picture only
Anna Griffin Papers, AG 286, AG 301, AG 203 AG076
Crème Cardstock
Cruel Frame 4 inch
4 Mosaic Tiles by Westrim Crafts
Ribbon made by Michaels Stores
4 Photo corners
Gold Ink Pad
Mini Glue Dots
Foam Squares
How To
I cut the background papers to size. AG286 was cut to 8 X 8inches. AG301 was cut to 7 ½ X 7 ½ inches. AG203 was cut to 7 X 7inches. Another piece of AG301 was cut to 5 ¾ x 5 ¾ inches. After cutting out the photograph, I used mini glue dots and added them to the back of the cruel frame to attach the photo securely. Then I created the other elements. I added the ribbon to the top paper. It measures 5 ¾.inch. The title was made using the computer. The font is Abigail. After cutting out the banner shape I matted it with crème cardstock. I took a gold ink pad and rubbed it on the sides for a distressed look. In the center of the back I added foam adhesive squares to raise it off the page. I added 4 gold mosaic tiles. Lastly I added 2 things, the photo corners to one of the background papers and a bow under the photograph.
MATERIALS Right Layout
Anna Griffin Papers: AG155, AG216, AG030, AG031-
Clear stamps by Autumn Leaves Company-
Pearl Ez Metallic Powder (rust color)
Watermark Ink Pad
Photo corners
Ribbon made by Michaels Stores-
4 Photo corners
Purple beads
Gold circle beads
Gold Pen
Patterns n pen journaling template
Need clear stamp name brand
ZIG embossing pen
Patterns N Pens journaling template
Beads by Bead Treasures
HOW TO:
First I measured out the background papers. The main background paper (AG076) is 8 x 8 inches. Then the 2nd (AG031) was cut 7.5 x 7.5, and the final paper (AG216) is 6 ¾ x 6 ¾. Before attaching them together I added the thick purple ribbon between the 2nd and 3rd layer of papers. After attaching all the papers I added 4 photo corners to the top paper. I took a journaling template and dry embossing it onto a crème marbled paper (AG155). To add a distressed look I rubbed a gold ink pad on the edges of it. Then, I added the 6 flowers (AG030) you see behind it. I just cut the 3 whole flowers in half. Then to finish I created the doodle designs with clear stamps. Its 2 layers. First, I created the chalk like pattern of the doodle images. I took the stamp and pressed it into a watermark inkpad. After pressing it onto the page I took a very small amount of Pearls Ez Metallic Powder and brushed it over the area where I pressed the stamp on the paper. This creates a little shadow. Then I took the clear stamps and pressed black ink onto it and put it right over the original image.
The journaling reads: 1941.This is a photograph of my grandmother, whom is in the back row, right. My mother is in the front row left and her sister (my aunt) id next to her. They are holding on right to their dolls. Happy Holidays.
No products have been added to this project.

Thanks for spreading positivity!


January 25, 2011