Thank YOU! It's Customer Appreciation Week!
EXTRA 11% OFF Orders $100+ With Code: THANKYOU
EXTRA 11% OFF Orders $100+ With Code: THANKYOU


 Give a Cheer
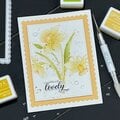
Stampalot September Challenge 'It's a Frame Up' & Anniversary Gift! shhh...
September Challenge
Good Morning everyone and welcome to our September Challenge here at Stampalot.
This month we are getting into the frame with the theme...................
"It's a Frame Up"
Your entry can be anything you choose providing you frame something on your project. It can be a frame made from nesties for example as some of the DT have done, or a ready made frame, but to be absolutely clear, matted nestie shapes with an image stamped on top will not be considered to be a frame. .......that means either the image or sentiment must be set within an actual frame. We want to be able to say 'What a great frame !'
Our wonderful sponsors Sir Stampalot have put together a fabulous collection of crafting goodies for this months prize.
***********
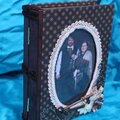
Not sure which came 1st: The Challenge or the Gift Idea.
Took me several days to work on this, also being my 1st Anniversary Gift for Greg, had to sneak it in bit by bit when he wasn't around.
Paper is for 1st... voila!
I know it's safe to post because he is however 'allergic' to the internet. lol
But still, shhh....
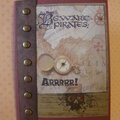
Altered a wood 'box' from the $ store (only $2!) that was designed to look like a Book.
Have added LOTS of pictures of all the angles and several near the bottom of 'work in progress'. In other words... scroll... scroll... keep scrolling... ;O)
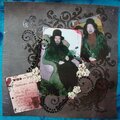
The picture is from our 'Dickinson'/Steampunk Christmas Photos last year. Since we both lurve Steampunk, went with that as the main theme for this project...
Intend to use the box to store some of the wee Paper bit collected 'About Us' starting with a copy of our Wedding Invitation and the papers we each read our personalized vows off of .
Started by gluing paper along the 'page' sides. Couldn't find 'stack of paper' patterned stuff, so I used an aged 'wood boards' paper. I think it turned out wonderfully... looks like old, worn and dusty gold trim pages. I do so wish the camera was better to get this detail clearer. I glued paper on then sanded edges, trying not to use the blade if at all avoidable for risk of slicing into the soft wood of the box.
Then I papered the 2 covers, folding the paper right around and corner cutting to make it look like true fabric binding. Then used a marker to heavily stain the ridges on the 'spine'. At this point light dawned on marble head and I unscrewed the hinges and took them right off. *smack* MUCH easier to work around now. The spine was then covered in ink rubbed cardstock, to get a 'leather-y' look. Bits and pieces between the ridges. (I wish THESE could have come off!) and an extra strip down each cover to get that wrap-around look. Then I touched up any white spots with same dark ink used on the spine ridges.
I removed the little pieces they had on the inside to hold the glass/picture in... glued it all in instead so it would be flat. Painted the inside edges black and laid down the Dragonfly Paper. Dragonflies were an important part of our wedding. Added the 'gift plate'.
Finally I embellished the outside: Antique lace around the photo, bit of bling, some fleurs, key and LOVE sign.
Fini!
Box from $ store.
Cardstock, Punch, Ink and Marker from Stampin' Up!
Gear Pattern Paper from Graphic 45, Steampunk Debutante.
Dragonfly Pattern Paper from Graphic 45, Botanicabella.
Worn Wood Pattern Paper from Stampin' Up, Rustic.
Key from Pixie Press.
Love Sign from Forever in Time.
Bling and Flowers from Prima.
No products have been added to this project.


Thanks for spreading positivity!


October 15, 2011