Thank YOU! It's Customer Appreciation Week!
EXTRA 11% OFF Orders $100+ With Code: THANKYOU
EXTRA 11% OFF Orders $100+ With Code: THANKYOU


Be the first to cheer this project!

 Give a Cheer
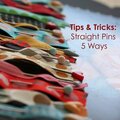
Ribbon Tutorial:

While standing at the counter in the craft section waiting to get ribbon cut I’ve been asked on more than one occasion , “What are you going to do with all that ribbon?” When I answer that I use it in scrapbooking they look at me like I’m crazy. So, this tutorial is dedicated to all those women, and their looks of confusion.

Ribbons are such an easy thing to use to add a fun twist to your pages. From beginners to experts anyone can use them effectively. I’m going to cover a few basic uses for the beginners and then add a couple more funky ideas. 


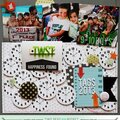
1. Tie one on.
The easiest thing to do with a ribbon is to tie it on to something. Punch a hole in your page and tie it through, tie it on to a tag, tie it on to a chipboard letter or shape, tie a bow and glue it on to your page. On the first example I punched holes in the scalloped edge of the card and tied ribbon through.

2. Mix it up.
There are several ways to mix things up. The first is to mix the patterns and colors. Much like patterned papers you don’t need to use ‘exact’ matches on colors. You want them to complement each other. Use stripes along with polka dots, wide stripes with skinny stripes, solids with patterned. 

Now that you’ve got a variety of ribbons picked out to use you can mix up how you attach them to your page. Tie them on differently, staple them, or loop them through a hole. This can add just the right amount of pizzazz. On both examples I mixed colors, prints, and types of ribbons as well as how I attached them.

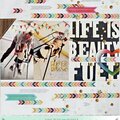
3. Straight as an arrow.
Now we’ll talk about adhering the ribbon flat on to your page. There are several ways to do this. One that I frequently use is just by running a sticky paper adhesive down the backside of the ribbon. (EK Herma Dotto or Tombo Mono Adhesives work great). Staples or brads are also an easy way to securely attach the ribbon. I used both all these methods on the layout example.

You can either use a full 12” of ribbon and run it all the way across your page or use less and trim the ends. A fun thing to do is use a variety of ribbons and cut them at different lengths and angles. You can turn ribbons from a simple embellishment to an active ingredient in your layout. Ribbons can help point the eye through your page. 

If you use the full length of the ribbon on your page you can use it to help divide or frame a space on your layout. Another idea is to use ribbon in the background pattern of your layout. This can add some texture to your pattern. Use it just like you would a strip of paper. While you are at it try using just ribbon for a background! I created my own funky background on the layout example.

4. You are grounded.
I am a big believer in grounding. My titles that is. Sometimes a floating title will work, but more times than not it needs to be grounded, so use some ribbon to do so. Again, use it just like you would a strip of paper. Leave it long or trim it to fit your title length. I used the top ribbon on the layout to ground the title on. It gave the title a place to rest.

5. Embellish your surroundings.
I love ribbon. That’s no secret. So why should I limit my love of ribbons to scrapbooking? You are right, I shouldn’t.
Decorate stuff. You know you’ll never be able to use all that ribbon in your scrapbooks!! Gather a few of your favorites and sew (or glue) them on stuff, an apron, shirt, blanket, jeans…..tie them on a basket, purse or bag….

Not to long ago we were out to eat and I saw a woman carrying the cutest bag. It had ribbons all around the top. My mom went and asked her where she got it. Wouldn’t you know, she made it and she was a scrapbooker. We are some fun people!

Now, go tie one on!


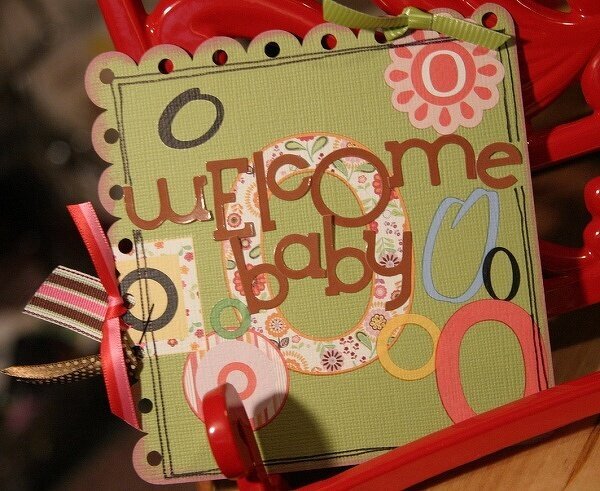
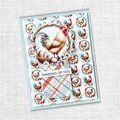
Welcome Baby O Card Directions
1. Cut cardstock to 5"x5" leaving to sides scalloped.
2. Cover background with letter rubons.
3. Add title stickers in middle.
4. Punch holes in center of scallops and tie, knot, and loop ribbons through.
5. Add pen detailing and chalk ink around edge.

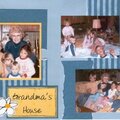
Who Are These People? Layout Directions
1. Start with cardstock background.
2. Begin adhering ribbons on from bottom up.
3. When you feel you have enough adhere photo.
4. Add letter sticker title.
5. Journal on transparency and tuck under photo.

Supplies:
KI Memories Black, Dirt, and Red Cookie Cutter Stickers
KI Memories Haunted and Grateful Sashes
KI Memories Grateful and Joyful Bobbins
KI Memories Joyful Color Lab
Me & My Big Ideas Monograms (similar to the ones I uesd)
Bazzill Mini Scalloped Cardstock-Brilliant White and Parakeet
Hambly Black Journaling Bits Overlay
Hermafix Permanent Transfer Dispenser
Mono Adhesive Permanent
No products have been added to this project.

Thanks for spreading positivity!