Thank YOU! It's Customer Appreciation Week!
EXTRA 11% OFF Orders $100+ With Code: THANKYOU
EXTRA 11% OFF Orders $100+ With Code: THANKYOU


Be the first to cheer this project!

 Give a Cheer
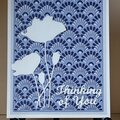
Thank you, Cindi, for your challenge; it's just the incentive I need to get me into the craft room to work on my Christmas cards each month. http://www.twopeasinabucket.com/mb.asp?cmd=display&forum_id=22&thread_id=3281903 [twopeasinabucket.com]
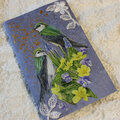
I made the focal pieces when I joined up with Nora S and cgee exactly four weeks ago. Then I wasn't sure what to do with them. I would wander into the craft room and stare at them. With time running out, I began to get some ideas. One night I die cut the silver and gold mats. Another night, I fooled around with patterned papers and then settled on the glitter paper. Last night, I wandered in once again, and at 1:59am this morning, they were finished.
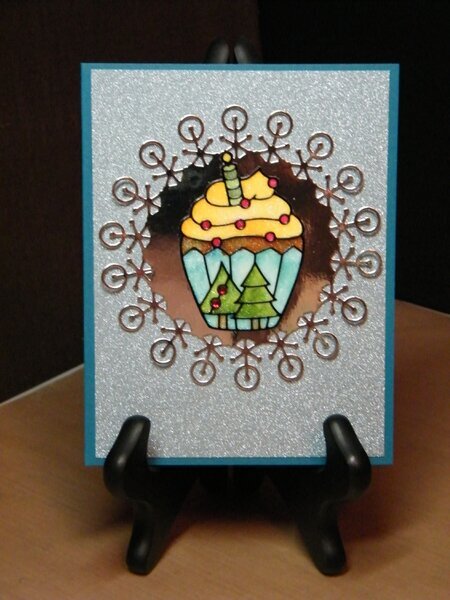
This morning I photographed the cards. Nora and her husband very generously gave me their camera when they bought a new one. I have a lot to learn about using it. I don't think my Ott light is the ideal light source since the colors seem faded out. I scanned the cards (last picture above) so you could see that the colors are warmer. The trouble with the scans is that the mirror paper I used looks black, and the glitter doesn't show up.
CARDS:
4 1/4“ x 5 1/2”
Bazzill Cardstock
DCWV Glitzy Glitter Cardstock Stack (more subtle than any glitter paper I've seen)
Unknown Mirror Cardstock, silver and gold (for the die cuts)
Memory Box Die - Jubilee Circle, #98497
FOCAL IMAGE:
Elizabeth Craft Designs Peel-Off Stickers, Christmas Cupcakes
Sookwang Double-Sided Adhesive
Elizabeth Craft Designs Microfine Glitter, Cool Diamond
Adirondack Alcohol Inks and Blending Solution
Ranger Alcohol Ink Fillable Pen
Niji Waterbrush
Prismacolor Blending Pen for their alcohol markers
Prismacolor Alcohol Markers
Stampedous Dot Sparklers, Silver (on harlequin cupcake)
Swarovski Flatback Rhinestones (on holly cupcake)
The Paper Studios Gemstones (on the Christmas tree cupcakes; more about those later)
Tombow Marker, black (to edge all of the cupcakes and to color the back of the first three)
Tip #1
I used the Tim Holtz Ink Palette to hold my alcohol inks. In theory, it's a great idea. Unfortunately, a few of the little wells that are meant to hold the ink leaked. I love the idea of using those palettes because I don't need to buy new alcohol markers. I may just buy another palette and hope it doesn't leak. I bought two from the same place, and both had a couple of wells that leaked. Sigh.
I put the blending solution in the Alcohol Refillable Marker (not the new version), and I didn't like it–little control over the flow. Maybe the new version will be better. I used my Niji waterbrush that has been holding Blender Solution for a couple of years without a problem and the Prismacolor Blender Pen for their alcohol markers.
TIP #2:
I raised the cupcake off the mirror cardstock not realizing that the white back would be reflected. For the second one I made, I transferred the black negative image to the mirror cardstock before attaching the cupcake thinking that would block the reflection. It didn't. I colored the backs of the rest with a black marker before attaching them, and that worked great. Now the reflection appears to be a shadow.
ANOTHER HEAD'S UP:
I got a great deal on the Paper Studio Gemstones. They came in a package of two sheets, each 1“ x 12”. I thought I could use the individual gems, but the adhesive was running in both directions instead of only one so I couldn't just cut the sides of each gem and slide it off. Even when I managed to get them off, it was close to impossible to remove the excess adhesive. I think these were meant to be used as a strip of gems, not individually. Don't ask me how many of these I bought. I don't know what I'm going to do with them now.
TFL.
Daria
No products have been added to this project.

Thanks for spreading positivity!