Thank YOU! It's Customer Appreciation Week!
EXTRA 11% OFF Orders $100+ With Code: THANKYOU
EXTRA 11% OFF Orders $100+ With Code: THANKYOU


 Give a Cheer
Yesterday, Nora and I attended two classes with Els Van de Burgt of Elizabeth Craft Designs at Scrapbook Territory in Berkeley. She was accompanied by her daughter, and they had everything organized beautifully. Both classes were wonderful, and Els was an extremely good instructorinformative, friendly, and patient, and her daughter was a big help. Els had dozens of cards she let us early arrivers look through; her designs and choices of colors, patterns, and embellishments are exceptional.
We made three cards in each of the classes. Now that I've taken this class, I have new respect for stickers. These cards were labor intensive. I know that with practice I'll get better at this, but there are a lot of steps and techniques involved in making these cards. I love every one of them. I only wish the shimmer and shine would show up in the scans.
TIPS:
1. When using double-sided adhesive: Don't touch the adhesive with your fingers. Use a piece of release paper to hold it down or burnish something attached to it.
When applying glitter, just pull back a portion of the release paper, glitter some of the adhesive, and then hold onto the glittered part and remove the rest of the release paper.
To attach an outline sticker to the adhesive (Class 2), first remove the release paper from one side. Lay it, shiny side up on the table. Put the sticky adhesive piece off to the side. Don't touch the adhesive. Remove the outline sticker from the sheet of stickers and lay it sticky side up on the release paper. (The shiny side of the design is against the shiny side of the release sheet so they can be separated later.) If you aren't going to cut the sticker out later, you need to use tweezers to position the sticker where you want it to be on the final project. Now pick up the adhesive sheet and place it sticky side down onto the outline sticker. Remove the release sheet. You're ready to add the glitter.
ETA: Video Tutorial by Els van de Burgt, Elizabeth Craft Designs
https://www.youtube.com/watch?v=Y6Fp7GgH0L4 [youtube.com]
2. For all cards using microfine glitter: After applying the glitter, rub in a circular motion with your fingers to burnish the glitter and make it shine. If you use a Mr. Coffee-type of coffee filter below your pieces, you can easily pour the extra glitter back into the jar. Be sure to brush away any leftover glitter before changing colors. We used a mop paint brush or maybe it was a mop-style make-up brush.
3. When die cutting something from cardstock backed with two-sided adhesive, put the cardstock face up and the die, blades down, on top of it. That way you will cut through the cardstock and adhesive, but not the release paper. If you place the die on the release paper side, it won't cut cleanly through all the layers.
CLASS 1:
Cards were 4 1/4 x 5 1/2 and 5" square.
SUPPLIES:
Cardstock: Card bases and mats were all cut and ready to use except for scoring. I had a bone folder, but some of the cardstock cracked. Next time I'll bring something to score the card base before folding it by hand.
Elizabeth Craft Design Dies: 5 Part Pine, Snowflakes, Wreath/Bow, Bunch of Flowers 1 (I think), Mittens, and Merry Christmas
Elizabeth Craft Design Silk Microfine Glitter: Forest Green, Cool Diamond, a red, and a blue
Elizabeth Craft Design Shimmer Sheetz: Blue Iris
Elizabeth Craft Design Peel-Off Stickers: Many choiceswe used them for borders and accents.
Elizabeth Craft Design Velvet Adhesive Sheets: White, for the bow, cuffs and snowflake on the mittens, and the Merry Christmas sentiment on the first card.
Elizabeth Craft Design Adhesive Sheets
Scotch Brand Mounting Tape
Ranger Glossy Accents
Judikins Trio Tape (worked great on the glitter)
Glue Dots (to attach the flowers onto the wreath)
Copic Markers: Yellow-Green and Prussian Blue and blender (I think. I carefully wrote down the colors we used, and then I threw the papers away when I was cleaning up.)
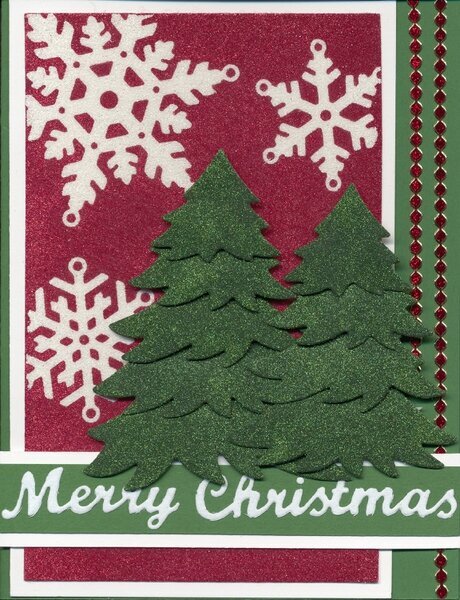
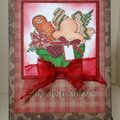
CARD 1:
We began by glittering the sections of the 5 Part Pine die set that had already been cut out for us on cardstock backed by two-sided adhesive sheets. Just pull back a bit of the release paper and glitter one section. Then you can pull off the rest of the release paper and hold the section that has already been glittered. Try not to touch the sticky surface before it has been covered with glitter. Next burnish the microfine glitter. (See Tip 2 above.) We assembled the trees with mounting tape.
To make the background we used snowflake masks which were left over from other projects where someone had die cut a bunch of snowflakes. We had pieces of double-sided adhesive already mounted onto cardstock. We carefully removed the release paper and set it aside. Holding the sides of the sticky-backed cardstock, we placed that on the table, sticky side up. We placed the snowflake masks, shiny side down, onto the sticky side of double-sided adhesive/cardstock. (The shiny side will release later when you want to take the masks back off.) We put the release paper back onto the piece, shiny side down, and burnished the snowflakes so they would adhere to the surface and not allow any of the red glitter to slide under them. We placed the piece over a coffee filter and covered the surface with the red glitter, tapped the piece off, and burnished the red glitter. Then we used a make-up type mop brush to dust away any loose glitter, put the piece in a clean coffee filter, removed the snowflake masks, and covered the remaining adhesive with white glitter. Els told us not to burnish the white glitter because it would bleed into the red glitter so it's not as shiny as the red background. It still looks great. The Merry Christmas was die cut from a piece of velvet backed adhesive. I wish I'd had time to clean the edges of the sentiment better or maybe have run it through the die cut machine another time.
We embellished with Peel-Off border stickers in red and gold.
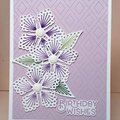
CARD 2:
For this card we had the wreath die cut out of green cardstock and double-sided adhesive already mounted onto white cardstock. We removed the release paper from the adhesive, placed the wreath in the coffee filter, and poured on white glitter. We removed it, burnished the glitter, and brushed it off the excess. Then we colored the glittered side with Copic Markers. I'm not used to using Copic markers, and the lady next to me was very helpful giving me advice.
We attached the glittered wreath to the green cardstock wreath using Glossy Accents. The layers are slightly offset so that the cardstock layer gives a shadow effect.
The bow and one layer of the flowers was die cut from a red Velvet Adhesive Sheet. The other layer of flowers (the part that looks almost black in the scan) was cut from Red Metallic Shimmer Sheetz. The sentiment, border, center of flowers, and berries are all Peel-Off Stickers.
CARD 3:
This card uses a technique I absolutely love. Els calls it the Iris Shimmer Sheetz Magic Transfer Technique. You can make three card fronts with one piece of embossed Shimmer Sheetz. Here's a video tutorial: http://www.youtube.com/watch?v=Q9He1kdAvcY. [youtube.com]
We use an embossing folder to emboss the Blue Iris Shimmer Sheetz. Then we placed the side with the embossed (raised) snowflakes face up (background color face down) onto the sticky side of double-sided adhesive. We placed the release paper onto the top and pressed down very well to burnish it. Then when we pulled the Shimmer Sheetz off the adhesive, the iridescent background color remained on the adhesive. The snowflakes remained untouched adhesive. Then we placed the adhesive piece into the coffee filter and added white microfine adhesive to cover the snowflakes.
We sanded the side of the Shimmer Sheetz with the embossed snowflakes to reveal the white core. In case you are wondering, the Iris Shimmer Sheetz have a white core except for Black Iris which has a gun metal core. The Gemstone Shimmer Sheetz have a silver core. I think that Metallic Shimmer Sheetz have a clear core.
We covered the die cut mittens with glitter the same way we did the parts of the Christmas tree on Card 1. You have to cut or fold the release paper so that the cuff remains covered while applying the blue glitter. After burnishing and brushing off the blue glitter, you remove the rest of the release paper and add white glitter to the cuffs. The ribbon, snowflakes, and ridges on the cuffs were die cut from a Velvet Adhesive sheet. (See Tip 3.)
The borders are from a sheet of Peel-Offs.
TFL.
Daria
No products have been added to this project.


Thanks for spreading positivity!


August 17, 2020