Thank YOU! It's Customer Appreciation Week!
EXTRA 11% OFF Orders $100+ With Code: THANKYOU
EXTRA 11% OFF Orders $100+ With Code: THANKYOU


Be the first to cheer this project!

 Give a Cheer
Nora S, CA-Melody, and I went to a Marathon Class at Stamp on Over in Sunnyvale, CA a little over a week ago. There are no more sessions of this particular class so I believe it's OK to post the cards I made there.
I was a little leery of going to the class thinking it would be all patterned papers, die cuts already cut out, and not much stamping. Well, as you can see, there was some of that, but so much more. I learned some new techniques and used tools I had never used before. Plus they served us a nice lunch, and we had a lot of fun. The class was supposed to go from 10:30 am until 4:00 pm, but many of us were not finished, and they let us stay and helped us out until the store closed at 6:00 pm. We still brought home some unfinished projects, but we had started all of them and had the supplies we needed to finish them off (mostly assembly).
1st CARD (front--scan #1, inside--scan #2)
Approximately 4 1/4" x 5 1/2"
I had to make an envelope for this one; 4" x 6" worked fine.
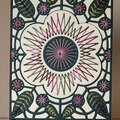
This was my favorite card. I don't usually make cards using different shapes, but this was such a fun one to do, I know I'll use it again. Nora has already posted a Christmas card using this layout: https://www.scrapbook.com/galleries/967511/view/4633853/-1/144/0.html
Dies: Memory Box A Bunch of Bats, Impression Obsession Halloween Hill, Spellbinders Circle
Black Spica Glitter pen used on the Halloween Hill die cut
Patterned Papers, all daubed with black ink around the edges
Stamp ("Halloween"), stamped with Memento ink and colored with Copic Markers
Tule tied in a knot (on rosette)
I'd never made a rosette before, and I love the way it turned out.
Rosette (Thank you, Melody, for taking notes!):
Cut paper 6 inches long by 7/8 inch wide, lightly scored at 1/4" intervals. Fan-fold and use hot glue gun to attach the ends together to make a continuous loop. Let the glue dry completely; then fold out into a rosette. Put a small amount of glue from the hot glue gun onto the craft sheet, put the center of the rosette on the glue, and put something on top to hold the rosette down and together until it dries. They used a small jar with sand in it.
2nd CARD (front--scan #3, inside--scan #4)
6" x 6"
They showed people how to use the We R Memory Keepers Envelope Punch Board to make an envelope for this card. I have this at home, and it's a very cool tool.
I was glad to have some more practice with the Elizabeth Craft Designs Peel-Offs and Starform Transfer Sheet.
Patterned Papers
Tonic corner punch (Ticket Punch)
Flat brads
Elizabeth Craft Designs Peel Off outline stickers on adhesive sheets glittered with microfine glitter and painted with Copic Markers
Transfer Sheet used to place the negative image onto the inside of the card
The sentiment is also a Peel Off sticker.
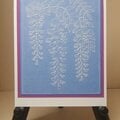
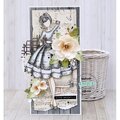
3rd CARD (front--scan #5, inside--scan #6)
4 1/4" x 5 1/2"
Leaves, hydrangea, corners, and gold lines are Elizabeth Craft Designs Peel Offs.
The green background and border papers are adhesive sheets with microfine glitter on them.
The hydrangea is on watercolor paper. We water-colored it with Distress Markers.
The leaves and stem are green although they don't look like it here.
The PSX sentiment (stamped at home) is stamped with Versafine and heat embossed with clear EP.
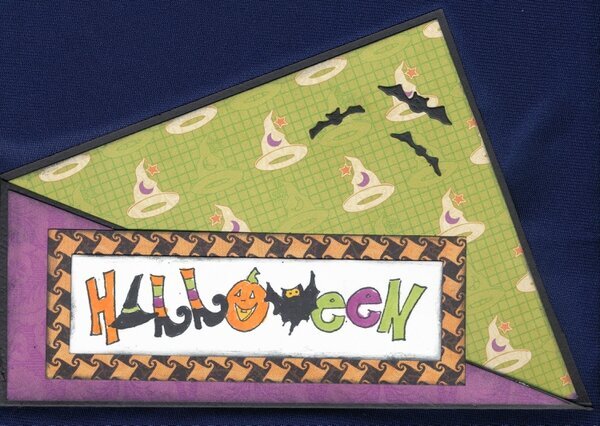
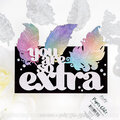
4th CARD (front--scan #7, inside--scan #8)
4 1/4" x 5 1/2"
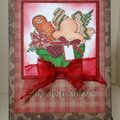
I almost dumped this one because the inside is badly smudged. Lesson Learned: Listen when the instructor tells you to wipe down the acrylic blocks before using them because the people before you might have left ink on them. Instead of dumping the card, I used a Stamp by Judith Stubby stamp to add all the dots to distract the eye from the smudges. I wish I'd used better colors on the images. When I colored the inside, I still thought I'd be tossing the card so I wasn't careful.
Patterned paper
Black cloth "boo" border
Hat stamped, colored, and then coated with Diamond Glaze
Gems added to wet Diamond Glaze
This is the first time I used a honeycomb image. We used the Score Pal to make a mark in the center of the card (4 1/4") and then moved that mark to the 6" mark. Then we scored the card ¼" before and ¼" after the 6" mark, creating a channel in which to place the honeycomb hat. (I think we moved the card away from the 4 ¼" mark since it had extra channels for scoring making it more difficult to see the ¼" marks.)
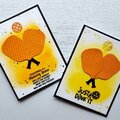
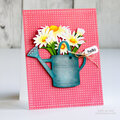
5th CARD (front--scan #9, inside--scan #10)
4 1/4" x 5 1/2"
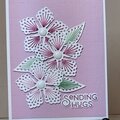
My Favorite Things Die-Namics (Modern Morocco) lattice die
We die cut the lattice background and placed it over patterned paper.
We inked the flowers and leaves directly on the stamp and then stamped the images. The flowers were stamped with two or three shades of ink in two or three layers (petals, centers, and stamen). After stamping, we die cut the pieces.
Stickles Diamond Dust on flowers and circle
Hot Glue Gun used to attach button and cording
Tip for die-cutting stamped images:
First, make a template by die-cutting the image on another piece of paper. Tape the die onto that die cut piece in one spot to create a hinge. To position the stamped image correctly, place it beneath the die/template you hinged together. When you lift the template, you'll be able to see and position the stamped image below.
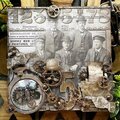
6th CARD (scan #11)
4 1/4" x 5 1/2"
This was the first card we tackled, and it took a long time. We packed it up, unfinished, just so we could move on to another card.
The patterned background and car are stamped with Memento ink and colored with Copic markers.
The car was stamped once on the die cut piece and again on another piece of paper. The second car is cut out and placed over the first image with foam tape.
Flat brads on wheels
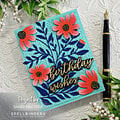
7th CARD (scan #12)
4 1/4" x 5 1/2"
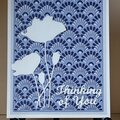
Cuttlebug embossing folder for the background
Ink Pad used directly to paper to highlight the embossed pattern
Glaze Pen used on the die cut cake layers (patterned paper)
The die cut pieces were given to us.
8th CARD (scan #13)
4 1/4" x 5 1/2"
This was my first experience with a hot glue gun. Once I tried it out, I was sold, and I used it for the rest of my cards. I actually have one, but I was a bit afraid to use it. Now, I'm not.
Stamp-a-ma-jig used to center wreath and sentiment
Prismacolor colored pencils
Hot Glue Gun to place fibers
Dauber to add ink around edges of mat and white pieces
Patterned Paper
That's it. I don't know the brand names of most of the things we used so that information isn't there. I keep adding it when I find the item. I'm looking forward to the next Marathon Class in November–Christmas Cards!
TFL.
Daria
No products have been added to this project.
Thanks for spreading positivity!