Livestream Party!
Join us today at 9:00am PT / 12:00pm ET | Details Here.
Join us today at 9:00am PT / 12:00pm ET | Details Here.


Be the first to cheer this project!

 Give a Cheer
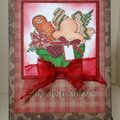
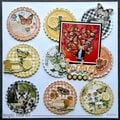
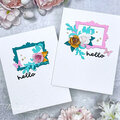
ETA-1: In real life, the colors on this card are much brighter. The focal piece is shiny, and the gold paint shimmers. The copper background also shines.
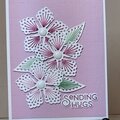
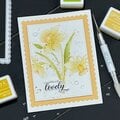
ETA-2: I changed the coloring on the original card (second picture). Every time I looked at it, I disliked the way I alternated shades between the sections. Now I'm wondering if I should try to redraw the lines between each section.
This card is for Anna-Karin's Texture It Challenge: http://www.twopeasinabucket.com/userblogpost.asp?id=71543. [twopeasinabucket.com] Anna-Karin gave us many samples of ways to create texture. My card uses heat embossing, dry embossing, and crackle paint.
Anna-Karin, thank you for this challenge. It was fun to see all the samples you lined to your blogso many ways to add texture to our projects.
CARD:
4 1/4 x 5 1/2
Bazzill cardstock (Spruce)card and mat
FOCAL IMAGE:
StampCopper Leaf Creations, 2001
Versafine Onyx Black Ink
Ranger Clear Superfine Embossing Powder
Prismacolor Markers (alcohol markers)
Distress Crackle PaintClear, Rock Candy
Craft-T Luster Rub-On
I stamped the image on a piece of 140-lb. hot press watercolor paper I had painted with what was left on the craft sheet after finishing another project (Golden Fluid Acrylic Iridescent Gold Deep, Fine). I heat embossed the image and colored it with alcohol markers. Then I put on a thick layer of the crackle paint and walked away for a few hours. I used my finger to apply some Rub-On to accentuate crackle effect.
BACKGROUND MAT:
Neenah Classic Crest Solar White Cardstock
Versamark Ink
Stamping Details Embossing PowderKettle Copper
Ranger Antiquities Verdigris Embossing Powder (on first sample and card); Judikins Rustique Patina Azure Embossing Powder (on second sample)
Cuttlebug Embossing FolderDiamonds in the Rough
I used a technique I learned at a Michael Strong workshop. He called it Weathered Copper.
1. I inked half a sheet of cardstock with a freshly-reinked Versamark inkpad.
2. I poured on the embossing powder covering the entire piece and heat embossed it.
3. I heated up small sections of the copper EP and sprinkled some of the Verdigris or Azure EP on the melted copper EP and heat embossed it. You repeat this step all around the cardstock.
Note: You get a finer spread of EP if you hold your fingers up higher and rub them together as you release the EP. In the first sample, I had a lot of clumps of EP, but I did better on the second sample.
This was easier when I did it at the workshop where I only made a small piece for one card.
Then I embossed the background piece with an embossing folder and assembled the card. Done.
TFL.
Daria
No products have been added to this project.

Thanks for spreading positivity!