Storage & Organization up to 60% OFF!
Plus, a FREE Gift! | Details Here.
Plus, a FREE Gift! | Details Here.


Be the first to cheer this project!

 Give a Cheer
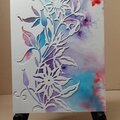
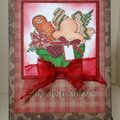
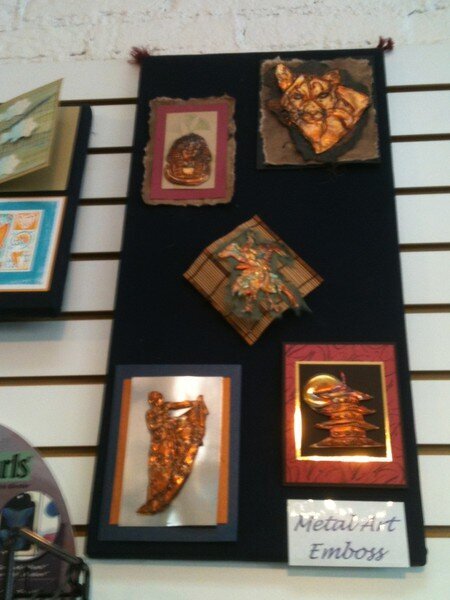
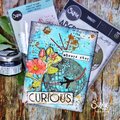
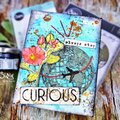
My sister Linda gave me a gift certificate to Stamp It Rich! in Placerville, California for Christmas. I had visited once and absolutely loved the store and all the beautiful samples that are displayed all over the walls. My sister lives near there; I do not. The gift certificate gave me an extra incentive to visit. When I went to spend my certificate, I was especially drawn to some sample cards featuring stamped and heated copper. You can see them in the last two pictures. I asked the store owner if she gave classes in how to make those cards, and she said she did and showed me a framed piece of art with gorgeous copper butterflies made with the same technique. I wish I had asked my sister to take a picture of that one so you could see it too. A couple of weeks later, I signed up for the class. I also signed up my sister, much to her dismay. She was so nervous. All the way to the class, she kept saying she was not artistic, she couldn't draw a straight line with a ruler, etc.–all things I have said about myself. The second picture up there is the one my sister Linda made. Wish it were mine! Yes, she's a happy camper.
The teacher's name was also Linda, and she was wonderful–very patient and very knowledgeable. I had told her that my sister Linda was there under duress, and she made sure Linda felt completely at ease throughout the class, and she gave both of us lots of hands-on help. She did most of the cutting on the horses' manes because my sister was afraid of ruining her piece; her hands were shaking.
The teacher began the class by giving us some basic information about metals and how they react. She gave us some stamped pieces of copper to practice with before we began our chosen pieces. She also sent us home with a couple of pieces to play with and a couple of gorgeous pieces of pewter to emboss after we have gained some confidence with the copper.
Details:
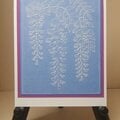
The teacher stamped our chosen images on medium weight copper with Staz-on ink. The leaves are from ERA Graphics; I don't know who makes the horse image, but I'm going to find out. Isn't it beautiful!
One nice thing about the class was that a beginner could do this technique without investing in specialized tools and supplies. We used an ordinary stylus and a couple of paper stumps to emboss and smooth/stretch the copper. We used a legal pad as a surface, the back for a harder surface and the front for a softer surface. We also used a piece of embossing suede on top of the front of the pad for an even softer surface when we stretched the metal.
Essentially, we used the stylus to deboss the major lines of the design. Then from the back side, we debossed right next to the inside of those lines. Then we stretched and smoothed the areas between the lines so they would be puffed out on the front. I went back and debossed the front a bit more so that the puffed areas stood out. Then we went to the back again and pressed a paper stump firmly along all the edges, making the edges curl toward the back slightly. (Actually, I think we did that last step after we heated the copper.)
The last step was the heating of the copper to change the color. The teacher again gave us practice pieces of copper to try out first. She explained that the color would change to bronze to rose to blue to nothing. I asked if we were going to use a torch or a heat gun, and she said she liked to use a candle because it gave her better control of the changes that would take place. I had never thought to use a candle. I'm a bit afraid of the torches. I have used a heat gun, but the heat goes all over and you have very little control of how the copper changes. When we heated our embossed pieces, the teacher helped us. She actually took our hand and guided us through the first part, and it was a good thing she did. A few minutes ago, I embossed and heated the small piece she sent home with me to help me remember the steps I was writing down here, and I did even better with the heating step. I can see that with practice, one can get pretty good at that.
One other tip about heating the copper. Heating the copper tempers the metal. If you remove the piece from the heat, you cannot go back and change the color since it's tempered. My unembossed practice piece changed so fast, I paniced and pulled it away from the flame. After that, I couldn't go back and change anything. When I did my final piece, I kept reminding myself not to pull the metal away from the flame until I had finished.
The teacher mounted and framed our work for us and let us choose our background. She had a big bin of papers on the table (but said we could use any cardstock in the store) and lots of bling and other supplies, such as skeleton leaves to augment the design. I chose the netting, and Linda chose some magenta gems for the eyes of her horses. The black outer edge of the frame is actually 3/4" wide, but I couldn't fit the whole thing on my scanner so it looks much more narrow here.
Thank you to Linda, my sister, for going with me to this class. You are such a good sport! Thank you to Linda, the teacher, for giving us such a wonderful workshop. It was great, and I learned so much. I'll be watching your website for more classes.
TFL. Daria
No products have been added to this project.

Thanks for spreading positivity!