Thank YOU! It's Customer Appreciation Week!
EXTRA 11% OFF Orders $100+ With Code: THANKYOU
EXTRA 11% OFF Orders $100+ With Code: THANKYOU


Be the first to cheer this project!

 Give a Cheer
Here is a link to Daniel's Tutorial:
http://www.twopeasinabucket.com/mb.asp?cmd=display&forum_id=22&thread_id=3019400. [twopeasinabucket.com]
OK, Daniel, I gave it a whirl and really liked doing this. I admit that I was leery of using a heat gun on anything foam. I used my pizza stone covered with aluminum foil and worked in the kitchen. I figured I'd rather have my kitchen burn down than the craft room.
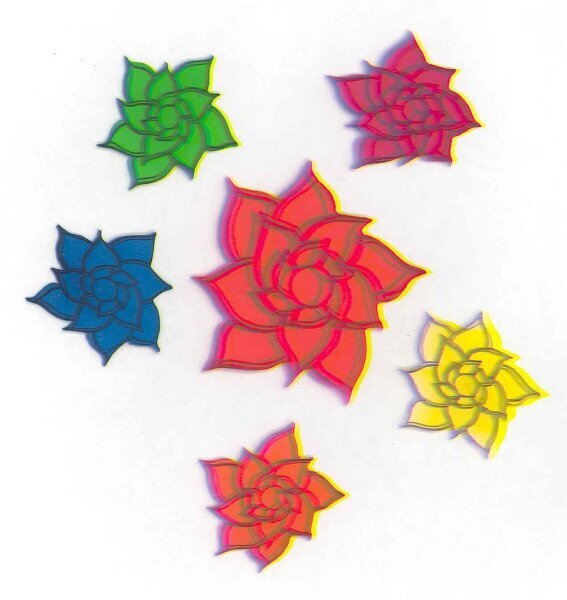
The craft foam I used was Crafters Square Foam Sheets (40 4x 6 pieces for $1.00). They are very thin1.5mm thick.
#1. SHRINKING CRAFT FOAM
I stamped the foam with a Magenta image inked with Staz-on, let it dry a bit, and cut it out. The first piece I heated with the heat tool worked beautifully and put all my fears to rest. Now confident, I began to heat the second one and scorched it instantly. Hmmm. I think I got the heat tool too close to the foam. After that, I was more cautious, and all went well. I only melted one a little bit on the back (the blue one), and it's still fine.
The original image was 3 15/16 wide at it's widest point. The shrunk images are 1 13/16 at their widest point.
What I noticed: The foam does not turn in on itself as much as shrink plastic does. It's easy to control it. I used a narrow metal spatula to maintain control. I found that I could turn the foam over and heat it from the other side whenever it began to curl up. Heating the bulging side straightens it out just like it does with shrink plastic. I stopped the heat gun at intervals for just a second so that the foam did not overheat and melt.
#2. INTAGLIO TECHNIQUE
A) I inked an Uptown Design Co. stamp with VersaMark. Daniel didn't say to do that, and now I think it was unnecessary. I wanted to protect my stamp. I heated the foam and then stamped into it. I waited about 30 seconds and removed the stamp. I could hardly see the image. Maybe I didn't let the foam get hot enough, or maybe my foam pieces are too thin.
B) I inked the same stamp with Versafine Deep Lagoon and did the same procedure as above. This turned out really cool. I love the way it looks. However, when I wanted to scan it, it still wasn't dry. I blotted it and went ahead with scanning it. (Maybe I need more colors of Staz-on.)
#3. INTAGLIO TECHNIQUE WITH EMBOSSING FOLDER
The first piece of foam was plain. I heated it and stuck it into a Sizzix embossing folder. I put a piece of wood over the top and stood on it for 30 seconds. Results were unimpressiveprobably for the same reasons stated in 2A above.
The second piece came out much better. I brayered Nick Bantok Sapmoss Green on one side of the embossing folder before adding the hot foam. This one looks much better, but I don't think that ink is going to dry. Most of it was blotted off so I could scan the piece. Also, even though the ink made it possible to see the design, the intaglio effect was disappointing.
Question: Why doesn't dye ink or my VersaFine dry on foam? Both will dry on glossy cardstock. Will they dry eventually?
Question #2: Daniel, just how hot does the foam have to be for the Intaglio Technique? I was afraid it would start shrinking so I probably didn't get it hot enough.
Thanks for the fun tutorial. I think those flowers will make a cool card a la Warhol.
Daria
No products have been added to this project.


Thanks for spreading positivity!