Thank YOU! It's Customer Appreciation Week!
EXTRA 11% OFF Orders $100+ With Code: THANKYOU
EXTRA 11% OFF Orders $100+ With Code: THANKYOU


 Give a Cheer
I made all of these at a class at Mainely Stampin' in Fairfield, CA. This was a small class with three instructors. Each one sat a table with four students and taught us to make two different cards. There was a lot of individual attention. All the paper cutting and die cutting was done before class began so the focus was on technique and assembly.
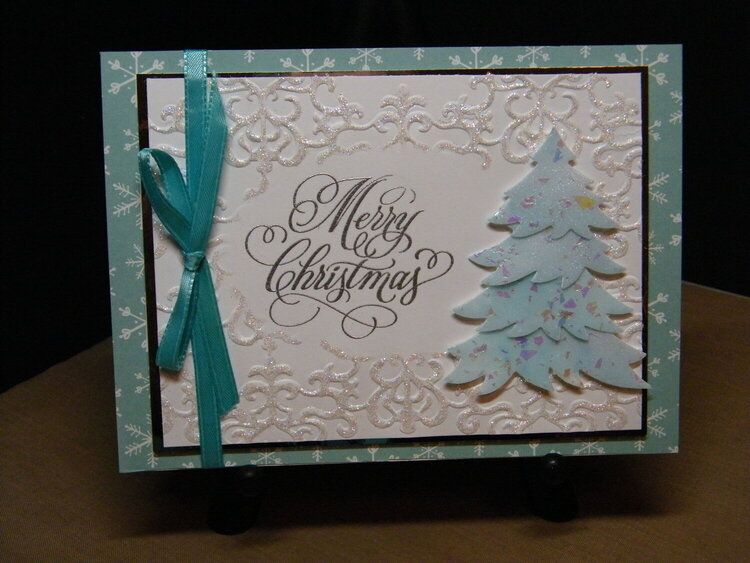
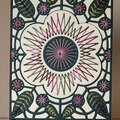
CARD 1
6 ¾" x 4 15/16"
TREE
Elizabeth Craft Designs 5-Part Pine
Faber Castell Gel Medium
Gelato
Stampendous Frantage Shaved Ice
Stampendous Crystal Micro Glitter
Scotch Foam Mounting Tape
Best Creations 3D Foam Tape
SENTIMENT
Just Rite stamp
VersaMark ink
Silver EP
BACKGROUND
Cuttlebug Embossing Folder, from Paper Lace 2 Set
Tim Holtz Embossing Diffuser
Stickles, Stardust
OTHER
Unknown patterned cardstock attached to white card base
Silver Mirror cardstock (for matting)
Ribbon from my stash (We were given a beautiful wide red ribbon, but I decided to use this one instead.
The die cuts for the tree were already punched and altered for us since it takes a very long time for the gel medium to dry. We practiced the technique on a piece of cardstock. Put a dollop of gel medium on a piece of plastic, shave off a few bits of Gelato and mix together, adding Gelato sparingly. Then add the Frantage and micro glitter. Spread the mixture on the cardstock and set aside to dry. (Don't make it too thick to die cut, and plan on leaving it to dry overnight.)
Now I'm thinking you could die cut the pieces first; then you wouldn't have to worry about die cutting through the gel mixture.
The ribbon was fastened around the patterned cardstock before attaching it to the card base.
I had trouble using the embossing diffuser. When I followed the directions and put the diffuser on top of the sandwich, it slipped every time I pushed it through the Big Shot. The instructor suggested putting it beneath the embossing folder and putting the other plate on top. That worked fine. (I don't remember having that problem when I tried mine out with the Cuttlebug.)
It took quite a while to apply the Stickles over all the embossed parts of the design in the background, but it was worth it. Very pretty!
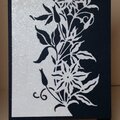
CARD 2
5 1/2 inches square
WREATH AND FRAME:
Poppy Stamps #824, Breezy Wreath
Impression Obsession, Twig Wreath
Tattered Lace Die Set, #D412, Krystal (frame)
VersaMark (to emboss white twig wreath and frame)
Stampendous Detail Embossing Powder, Ivory (on white twig wreath and frame)
Stickles, Platinum (on white leaf wreath and frame)
OTHER:
Hero Arts Banner and Messages Set
Unknown pendant
Seam Binding Ribbon (really beautiful!)
White Cardstock base
Unknown patterned paper mat
CARD 3
5 1/2 inches square
The sample card for this one was so cute, but I wasn't brave enough to distress mine as much as the original which had torn and rolled edges. I just used scissors to distress the edges of the patterned paper pieces and the focal image. Looking at the picture right now, I see I need to fray the cheesecloth more on the top.
Also, the pink and pp mats were cut too small so I had to improvise a bit with the design, but it's still a darn cute card.
Stampendous Country Snowman; Sparkle with . . .
Tombow Markers (blues (243, 312); pinks (761, 796); brown (?)
Stardust Stickles
Unknown patterned paper
Cheesecloth
Memento Ink
We scribbled the markers onto the craft mat and picked it up with a wet paint brush to color the snowman.
Then we applied stickles sparingly with our fingers to the snowman, and two smaller patterned paper pieces.
CARD 4
6 inches square
Crafters Workshop Cosmic Swirl Stencil
Cosmic Shimmer Sparkle Texture Paste
Mirror Cardstock
Velvet paper (mat)
Bazzill black cardstock (card base)
Seam binding ribbon
Graphics 45, key embellishment
We taped the stencil down over the mirror cardstock with removable tape and applied the texture paste very thinly over the stencil. We removed the stencil and set the piece aside to dry. We also dried it a bit with a heat gun, but mine was still sticky when I took it home where I finished the card the next day.
The texture paste is super sparkly and the color of the mirror cardstock shows through it.
CARD 5
6 inches square
Tattered Lace Christmas Die Set, Door and Wreath
Tattered Lace Die set, Lavish Poinsettia
Prima Holiday Jubilee Resins (wreath)
Prima Color Bloom Spray Mist, Gold Foil and Emerald (on wreath)
Gold Mirror Cardstock
Just Rite Sentiment Stamp
Stickles, red (on wreath)
Swarovski Flatback Rhinestones, SS12, Jonquil (I added these to balance the design a bit.)
Memento Ink
CARD 6
4 1/4" x 5 1/2"
Stampendous, Fall Float
Unknown sentiment stamp
90 lb. watercolor paper
Distress inks and water (leaf)--Peeled Paint, Fired Brick, Spiced Marmalade, Mustard Seed
Tombow markers and water (mouse)--N65 (gray), 947 (brown), 850 (flesh), 451 (blue)
Brown cardstock (card base)
Glitter paper (mat)
Red cardstock (mat)
Scotch Foam Mounting Tape
Unknown, discontinued punch (small leaf)
Seam Binding Ribbon
The focal image was stamped twice. We water colored the leaf for practice and then we water colored a second leaf that we fussy cut, embossed with two layers of UTEE, and attached over the first leaf with dimensional adhesive.
We heavily spritzed the ribbon with water and crushed it in our hands to create wrinkles. Then we heat dried it. (That took out most of the wrinkles. It would have been better to let it dry naturally, but there wasn't time for that.) The instructor showed us how to tie a triple bow by securing one end with thumb and ring finger and wrapping the long part around the 1st and 2nd fingers widely spread apart. Cool!
TFL.
Daria
No products have been added to this project.


Thanks for spreading positivity!


November 09, 2014
November 03, 2014
November 03, 2014
November 03, 2014
October 31, 2014
October 31, 2014