Storage & Organization up to 60% OFF!
Plus, a FREE Gift! | Details Here.
Plus, a FREE Gift! | Details Here.


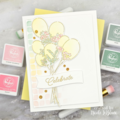
 Give a Cheer
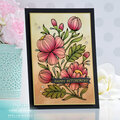
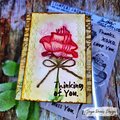
This wreath was begun with a base of tightly wound very very thin, bendable branches and dried leaves, held together with wire. (If you want to, you can purchase one already put together at a craft store and skip this step). I then wrapped a wine colored see through wide ribbon (wired - it's easier to shape) around and around the wreath, diagonally, so that in between each section of ribbon, you could still see sections of the branches. Next, I created a bow with the excess ribbon, affixing it to the top of the wreath using a pipe cleaner. I then used a Succulent Flower design from my Silhouette Cameo Design Library and adapted the size to fit my desired effect for this project before beginning any cutting. I was seeking an Americana feel for the final effect. So first, I looked through the paper I had on hand that I liked to get started with. I'll walk you through each flower. The top left white flower started out with plain white card stock. After I cut the flower in my silhouette cameo, I used a polka dot embossing folder and ran each floral piece through my Sizzix Texture Boutique. (I also have a cuttlebug for die cuts and embossing), but I find I tend to like the embossing results with my Sizzix better). Poking a hole through the center of each petal, then rolling the two sides of each flower petal in the opposite direction of the ones that will lay above it, I then alternated the layering until I liked the way the flower looked. I found some red, white, and blue brads that were perfect for holding my flowers together. Once I used my hot glue gun to glue that white flower in place, I was ready for flower number two. This one was water paint paper on which I used my ink sponges on the handles (with the Velcro that holds the sponge in place) and in a circular motion, inked these petals varying tints of blue and red. Flower three was a lovely pink and white designed paper I found in my scraps. It was perfect. I also found s pretty piece of scrap paper big enough for me to make flower four with. Flower five was a burgundy card stock. I have an old stamp that has a nice pattern on it that's great for backgrounds and/or embossing. I think it's a stampin' up. I love the effect of gold ink and clear embossing powder on darker colored paper. So that's what I did. Note: I always stamp before cutting in this case. Trying to stamp and emboss all those little pieces after they are cut is a real pain. The next white flower is just another flower embossed with a floral embossing folder I had hanging around. The blue flower is similar to the burgundy one, except I used a different stamp with white ink and white embossing powder. For the last flower, I spritzed water on my craft mat, then sprayed Heidi Swapp Navy and Heidi Swapp Pink (I didn't have any red) in alternate places all over the mat. Then I took the petals, which had been cut from watercolor paper, and dragged them this way and that through the liquid mixture. I noticed that I really liked the coloring best when both colors had mixed together. So I let the pieces sit a bit before drying them with my heat tool. They look so cool. Like a cross between water colors and sponge painting. I hope you like it.
No products have been added to this project.

Thanks for spreading positivity!

%20-%20Scrapbook.com)


June 29, 2015