
Happy National Scrapbook Day!
Extra 10% OFF Select Scrapbooking Brands with Code: NSD24
Extra 10% OFF Select Scrapbooking Brands with Code: NSD24


 Give a Cheer
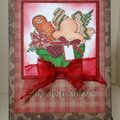
I bought this stamp long ago; I thought it was cute. When I tried coloring it, I could not get it right. A week ago, I visited Nora and asked her advice. She grabbed an image and one of her Copic Markers and, with a few strokes, came up with an image I liked. I stamped a bunch of images and copied Nora's coloring as best as I could.
This is a CAS card. If I make it again, it is going to be very easy. However, it took me days of trial and error to come up with this card. I tried several different ways to color the jingle bells. When I was happy with those, the image still looked dull. I used an alcohol marker to put in that bit of red on the bit collar; that made a huge difference. I used Micron pens to darken some of black areas like the nose and hooves and to add the missing rein on the right side of the reindeer.
I wondered what those protuberances were on its head near the antlers. I thought maybe I'd bought a reject and decided to fussy-cut the reindeer and eliminate them. I fussy-cut one and knew I didn't want to cut out the rest of them. The image is so small and there are lots of ins and outs to create the shaggy look.
My original idea was to copy a layout I saw on Bonnie Klass's blog.
https://bon2stamp.blogspot.com/2019/05/tis-season-for-cas-christmas.html
She used a brick embossed background you could see through a window of plain cardstock and attached her focal image on that background. I loved her card, and I was going to do the same except I planned to use a birch tree embossing folder. When I tried this, the card looked very plain. My image was smaller than Bonnie's and not at all colorful. Then I had the brilliant idea of reversing the layout. I embossed the card front and die-cut the window out of that embossed piece. That way I didn't have to cut out the reindeer; I could just put the whole piece behind the window. That meant I would have to color those mystery protuberances. I Googled reindeer and saw that many of them had stubs and horns on places on their heads that we never see on Santa's reindeer. I mixed brown and gray markers with water and painted them.
I embossed the card fronts and spent way too much time figuring out which part to use on the cards. The first piece came out with a wide blank space to one side. Eventually, I was ready to put the cards together. I attached everything directly to the card base, and the card looked flat and uninteresting. I used mounting tape on the second card, and that made a huge difference. I used Un-du to take apart the first card and redid it and finished all six cards. At last. Done.
This is a longer description than usual of how I make cards. I thought about how often I look at CAS cards that I love and think I could do that too. Well, sometimes a CAS card needs a lot of forethought to make it right. A couple of Christmas's ago, I made a CAS card with a glittered bare tree and die-cut foil cardinals and paste-embossed snow. I made a lot of those cards, and they took forever. I counted out thirteen separate steps for each card, and even though I used the assembly line technique to put them together, it took a very long time. https://www.scrapbook.com/galleries/13464/view/5793789/-1/0/0.html.
CARD:
4 ¼ x 5 ½ inches
Carnival Vellum 80-lb. Cover Weight cardstock, Red (card base)
Stampin' Up! Woodland 6 x 6 embossing folder
FOCAL IMAGE:
Abracadabra Stamp Maker Silly Reindeer
Versafine Onyx Black ink
Big Art Vellum Bristol 65-lb. paper (I originally planned to use colored pencils.)
Copic Marker, Raw Silk E53
Kaiser Craft Glitter Pen, silver (jingle bells)
Kaiser Craft Metallic Gel Pen (hardware on harness)
Micron Pen, Black 03 and 05 (redraw lines on jingle bells and touch-up)
Prismacolor Alcohol Marker, PM-4, Crimson Red
Tombow Markers N59 and 977 (watercolor the protuberances on reindeer's head)
Distress Ink, Antique Linen (shading toward bottom of focal piece)
Prismacolor white pencil (to lighten the white areas on the hooves after applying the Antique Linen ink)
3M Mounting Tape (on the back of the entire card front)
TFL.
Daria
No products have been added to this project.

Thanks for spreading positivity!


July 20, 2019
May 30, 2019
May 30, 2019
May 30, 2019
May 30, 2019
May 30, 2019
May 30, 2019