

Thank YOU! It's Customer Appreciation Week!
EXTRA 11% OFF Orders $100+ With Code: THANKYOU
EXTRA 11% OFF Orders $100+ With Code: THANKYOU


 Give a Cheer
I saw a new card by Sam Calcott of Mixed Up Craft, the Triple Diamond Point card, last wee, and decided to work on one inspired by her video. https://www.youtube.com/watch?v=K3ESQqfhJSs
Sam's card was a square 6x6, but I don't make square cards, and the postal service in the US doesn't like them either. So I adjusted measurements and elements and went with 5x7. I also changed it up to be a quad, because math... it was easier to divide 7 inches by 4 vs 3. Then I made two more, another 5x7 and a US A2 (our standard size). I did double up on the edge elements, simply because I didn't want an unfinished look on the inside of the card. I also added patterned paper strips on the inside. I did find that all the layers make the card front heavy, so a heavier base would be better, but with layers for the inside sentiment helps balance things a little more. This card *wants* to stand up, by the way, and works if stood vertically as well as horizontally, though it does lay flat.
The first card (red and black Christmas) was my first attempt at the card style and was meant to be a stash buster trying to use up some of my hoarded and unused stash (it's huge). I did this kind of layered poinsettia using patterned papers last year in the same way, making both standard and slimline cards. It is hard to see in my pictures, but the black and red card does have dimension in the flower and doesn't just blend in. The paper is fairly dark.
Red and Black card (5x7), Stampin' Up!: Black, White, and Real Red card stock, Beautifully Penned SAB designer paper (retired), Poinsettia Petals bundle, Double Ovals Punch, Real Red Rhinestones.
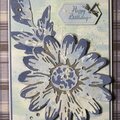
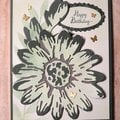
The second card (Fall birthday) is a card that I changed up over my original plan, which was to have been a case. Recipient is a dog lover, too. Happy coincidence is that the diamond points lined up so well with the ribbon. I hadn't thought of it when adding the ribbon, and I didn't want the diamond points under the ribbon. I dry fit all the punched elements (not dies), and added a second layer on foam dots/dimensionals. I'm particularly pleased with this one.
Fall Birthday card (5x7), Stampin' Up!: Dog Builder Punch, Autumn Punch Pack, vanilla weave ribbon from the Forever Greenery Trim Combo Pack (all on clearance); Early Espresso Faux Suede ribbon; Early Espresso, Cajun Craze cardstocks with scraps of Copper Foil, Soft Suede, Cinnamon Cider, Melon Mambo, Pumpkin Pie, and Mossy Meadow; Harvest Meadow DSP, Crumb Cake and Mossy Meadow inks; Peaceful Moments, Clubhouse bundle (retired), and Corner Bouquet (former SAB/retired) stamp sets. (FYI, the background paper for the photos of this card came from World of Good DSP, also on clearance.)
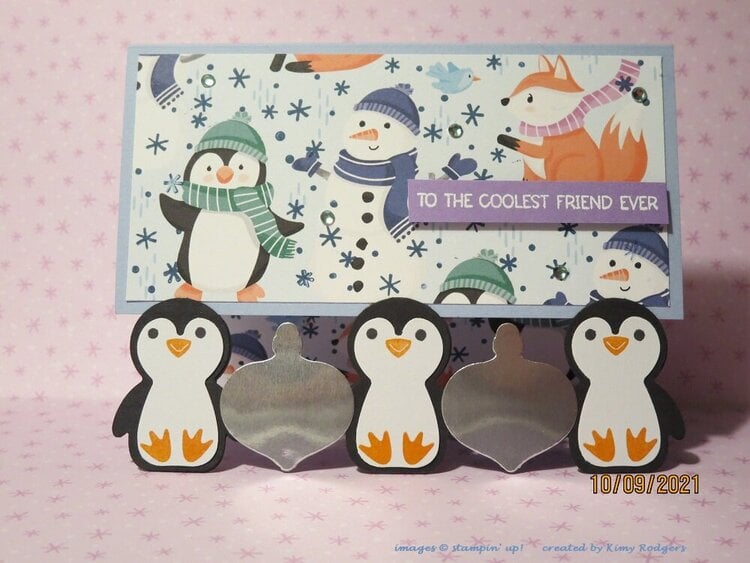
The third card is another stash buster and uses a cute penguin punch bundle I've been wanting to use! I saw another lady, Janet Casey, post her own card following Sam's tutorial, and she used a dual ornament punch pack that I have, too. She used the coordinating stamp set, but I wanted to stick with the standalone punches. But she did give me ideas. I used the smaller of the two ornaments, and there is actually a single dimensional (sticky foam dot) sandwiched in there to give a little dimension and illusion of a rounded ornament. I misjudged the amount of card I cut away on the front (those penguins were shorter than I thought), but I did make this work. It is strengthened and supported by the additional penguins on the back.
Penguin Christmas (A2/standard), Stampin' Up!: Seaside Spray (retired), Highland Heather, and Silver foil card stocks; Penguin Playmates papers (SAB/retired); Gleaming Ornament Punch Pack (clearance), and Penguin Builder Punch and stamp set bundle; Mango Melody, Just Jade, Misty Moonlight, Calypso Coral, Pumpkin Pie inks; Holiday Rhinestones.

Thanks for spreading positivity!


October 18, 2021
October 12, 2021
October 11, 2021
October 11, 2021
October 11, 2021
October 11, 2021