Thank YOU! It's Customer Appreciation Week!
EXTRA 11% OFF Orders $100+ With Code: THANKYOU
EXTRA 11% OFF Orders $100+ With Code: THANKYOU


Be the first to cheer this project!

 Give a Cheer
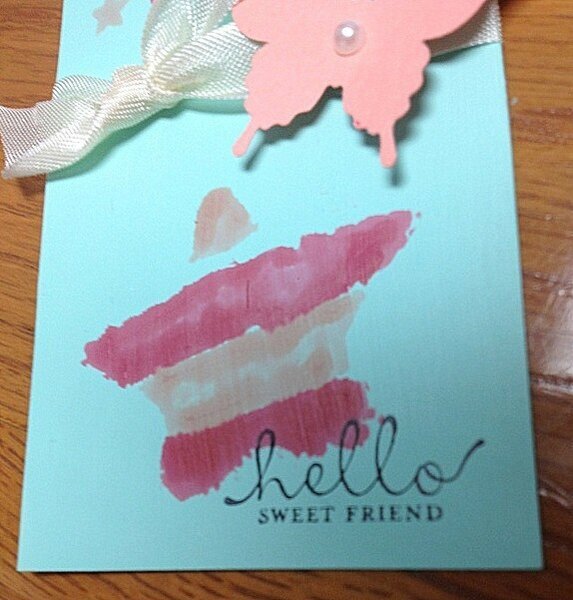
July 2013 Tag InstructionsBy: SWEETly MadeIngredients?Martha Stewart Large Manila Shipping Tag?Gesso?Martha Stewart Crafts Multi-surface High Gloss Acrylic Paint in Beach Glass?Paint Brush?Handmade star stencil?Stampin? UP! Classic Stampin? Pad in Crisp Cantaloupe?Stampin? UP! Classic Stampin? Pad in Strawberry Slush?Stampin? UP! Six-Sided Sampler stamp set (sentiment)?Citrus Twist March 2013 Main Scrapbooking Kit Exclusive Stamp Set (small stars)?Studio Calico Exclusive Stamp Set (back of a border stamp)?Stampin? UP! Crisp Cantaloupe cardstock?Stampin? UP! Elegant Butterfly punch?Stampin? UP! 1/2? Seam Binding Ribbon in Very Vanilla?Queen & Co. Pearl Accents?StazOn ink in Jet BlackRecipe1.Mix gesso and the paint together to paint the tag one color. Let the tag dry.2.Place your star stencil anywhere over the painted tag. Start stamping stars within one star shape. I used two different sized star stamps, each size using a different color ink. Make sure you stamp enough stars within the stenciled star to bring out the star shape.3.Place your star stencil towards the bottom of the painted tag. Use the back side of the border stamp (to get a solid line) and stamp stripes within the stenciled star, alternating ink colors.4.Stamp a sentiment towards the bottom of the tag, overlapping the bottom stamped star.5.Tie seam binding ribbon around the middle, making the knot a little off center.6.Punch your butterfly out of the cardstock and adhere to the ribbon next to the knot with small glue dots.7.Adhere a pearl accent in the middle of the butterfly.8.Attach some seam binding ribbon through the punched hole on top.
No products have been added to this project.


Thanks for spreading positivity!