Thank YOU! It's Customer Appreciation Week!
EXTRA 11% OFF Orders $100+ With Code: THANKYOU
EXTRA 11% OFF Orders $100+ With Code: THANKYOU


Be the first to cheer this project!

 Give a Cheer
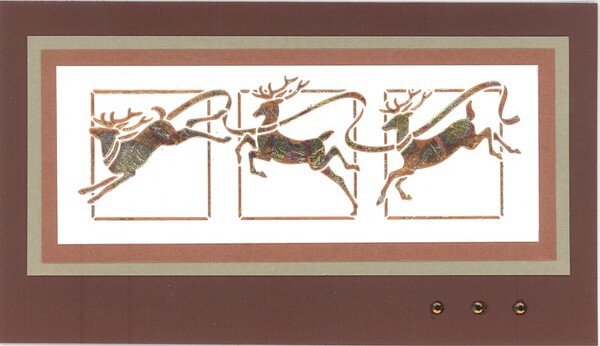
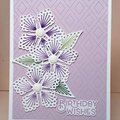
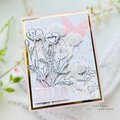
I finally finished some cards I began so long ago, I can hardly remember how the focal images were made. (I need more Christmas cards.)
Dreamweaver metal stencils
140-lb. cold press watercolor paper
Dreamweaver Metallic Gold Embossing Paste (pinecone cards)
Dreamweaver Metallic Copper Embossing Paste (reindeer card)
Tsukineko Essential Glue Pad applied with a large round Finger Dauber
Metal Leaf by Superior and by Mona Lisa
CARDS 1 & 2
4 1/4 x 5 1/2
Unknown cardstock on first card
Bazzill cardstock on second card (Gold Leaf and Emerald)
Variegated Green Metal Leaf (Mona Lisa on first card; Superior on second card)
CARD 3
7 x 4
Bazzill cardstock except unknown copper mat
Variegated Red Metal Leaf (not sure which brand)
Swarovski crystals SS16, Smoked Topaz
I'm sure the scans won't show the shimmer of the foil or the cardstock. Try to imagine it.
TFL. Daria
ETA: I've added this to answer a question about how to apply the metal foil. It's best to use metallic paste under the metal foils.
1. Use removeable tape to tape the metal stencil to cardstock. I like to use 140-lb watercolor paper, either hot press or cold press. Tape in the same order every time. I tape the top (The longest side becomes the top.), the bottom, and then the sides. Tape will be removed in the reverse order leaving the top tape in place to act as a hinge, making it easier to lift the stencil; if you drop it, it will fall back into place without ruining your newly pasted design.
2. Apply metallic embossing paste with an offset palette knife held at about a 40-45 degree angle. (The paste goes onto the bottom of the knife.) Use the palette knife a second time to remove excess paste. This time the knife is closer to a 70-80 degree angle. Remove tape from the sides and bottom of the stencil. Lift from the bottom using the top piece of tape as a hinge; it usually comes off as you lift the stencil away from the design. Put the stencil in water immediately. (I use a bit of Dawn Dish Detergent in warm water.) You can use a brush to clean the stencil later if necessary. Leave the stencil flat on the bottom of the container as you brush it so that it does not bend. Dry it with a soft cloth; an old T-shirt is best; paper towels will catch on the sharp edges of the design.
3. When the paste has completely dried, reposition the clean, dry stencil over the design and tape it down again. Use a finger dauber to apply glue from a glue pad; lightly pounce it on. You won't see the glue on the design, but you'll see it on the stencil. Dreamweavers uses the Palette Glue Pad which needs to be heated with a heat tool before it will work. (See 4a below.) I use Tsukineko's Essential Glue Pad which does not need to be heated. (See 4b below.)
4a. At the Dreamweaver Workshops, we removed the stencil and placed it in water while we heated the glue with a heat tool. It didnt't take long. Sing Happy Birthday a time or two. If you put the flat of your fingers on the image, it should stick to your hand as you lift it up. If it doesn't, apply more heat. Then we put the metal leaf on top of the image, pressed it down lightly, and then pounced a large stipple brush over the design to make sure that the foil stuck to the tacky surface. Then you use the stipple brush to brush away the excess metal leaf which can be re-used and to sharpen the edges of the design. If you brush too much, the foil loses some or all of its shine. (At the workshop, everyone pretty much agreed that the other glue pad wouldn't work for this purpose.)
4b. I usually use the other glue pad, the Tsukineko Essential Glue Pad. I don't need to heat it, and it seems to work fine. I apply it in the same way as mentioned in 4a. The first few times I used it, I removed the stencil after applying the glue and before applying the metal foil. Then I forgot to do that, and I had foil all over my tacky stencil. I thought I had ruined the stencil, but the glue and metal leaf easily came off in the soapy water. There was a bonus: I didn't have to use a brush to remove excess metal leaf and clean up the edges of the design. The image was perfectly foiled with sharp edges, and I didn't have to brush away any of the shimmer. Now I do it that way all the time. So easy.
5. Clean the stencil, and you're done.
I hope this helps. If you do a gallery search for Stencils, you'll find my other posts where I give a lot of detail about what I learned in the workshops and by just playing around with the metal stencils and stenciling.
TFL.
Daria
No products have been added to this project.
Thanks for spreading positivity!