FREE Standard Shipping on Orders $69+ with code:
FREESHIPPING


Cheers
Be the first to cheer this project!
Give a Cheer
Be the first to cheer this project!

 Give a Cheer
Clear Plastic has really made a statement in the scrapooking industry lately. We all seem to be in love with this new medium. It's interesting, different, but sometimes a little tough to use. It takes a little more planning to figure out where the adhesive will go and how to best showcase the clearness. This article contains several fun and interesting samples from the Garden Girls that are sure to get your creative juices flowing and make you reach for those clear plastic products you bought!
A quick search in Two Peas Shopping for "clear" yields quite a few results. Be sure to check it out!

Clear Backgrounds:
Page Frame Designs makes some great clear backgrounds. There are a variety of shapes and sizes. Adhere embellishments on top and behind for lots of layering possibilities. 
[[3]]
Cindy Liebel used a label shaped background to create a pretty and feminine page. Here's what she said about her layout,

"I used a 12x12 die cut sheet as the background for my page. i also added more clear types of embellishments like the butterflies, the snowflake dots, the title work & film strip. i had a blast putting like items together all on one page & limiting paper. (the butterflies at the bottom are clips holding up layout & the last photo you can see what lo looks like against white background)"


[[10]]

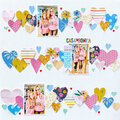
Keisha campbell also used a clear background, but used a large chipboard heart to outline the background. She attached her photos and embellishments right to the chipboard frame. 


[[1]]
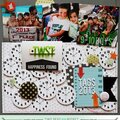
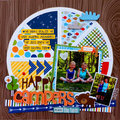
I used a clear background as well, but opted for a round one. I found that the Narratives Cream Circle sticker worked perfectly with the round background to help create an edge to the layout and keep the eyes within the layout. The background also has a little hole in it that you can use to tie a ribbon through either to hang it or for decoration. 


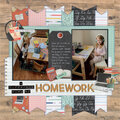
[[9]]
Stacey Sattler used a smaller page background for a photo mat! She used ink to help define the edge of the mat and the embellished with rub-ons and stickers. She also used Stickles to embellish a clear snowflake. 


Clear Accents:
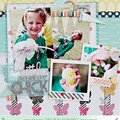
[[2]]
Wendy Bretz went above and beyond with her clear bookplates! She used repetition to create an amazing design as well as a place to put key words for her layout. The clear embellishments are great to repeat because they don't overwhelm a layout....well, because they are clear!


[[8]] 
Joy Uzarraga used little clear flowers to help embellish a flower pattern already on her background patterned paper. Once again, she repeated the design which works wonderfully with clear embellishments. The clear flowers add just the right amount of pizazz to the flowers on the background dressing them up a bit. 
Here's what Joy said, 

"Clear plastic shapes are wonderful embellishments that can add subtle touches to your layouts. In this layout, I used clear plastic shapes from Heidi Swapp's Mini Ghost Shapes Variety Pack. I used the clear florals with jewels in the centers to help accentuate the large flowers on the patterned paper (page 2). I took three clear butterflies, folded them in half and stapled them onto my layout (page 3 & 4). This adds dimension and a really cool effect."


[[11]]
Maria Grace Abuzman inked the backside of clear butterflies to create pretty painted looking embellishments in the perfect colors for her layout. Clear embellishments are so easily customizable for your needs. Use paint, ink, glitter, permanent markers, etc to make the just the right color.


[[12]]
Jamie Waters changed the look of her clear plastic embellishments as well. She did it though by backing them with patterned paper. The clear stars give the patterned paper a perfect amount of dimension and shine. Just how stars should be!


Clear Letters:
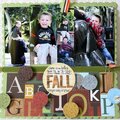
[[4]]
Lisa McGarvey used the large acrylic letters in her layout as perfect places for photo captions. Use a permanent marker to write right onto them. She also got jiggy with the spray paint! She spray painted the flower on the top left of her layout! 


[[5]]
Carrie Owens used clear letters right on the background of her layout. The clearness creates an amazing tone on tone effect. She also used a clear flower for the dot on the 'i'. She used StazOn ink and a bullseye stamp to create the cool pattern right on the flower. 


We hope we've inspired you to use some clear plastic on your next project!


No products have been added to this project.
Thanks for spreading positivity!