Happy National Scrapbook Day!
FREE Gifts + Extra 12% OFF Orders With Code: CELEBRATE
FREE Gifts + Extra 12% OFF Orders With Code: CELEBRATE


Be the first to cheer this project!

 Give a Cheer
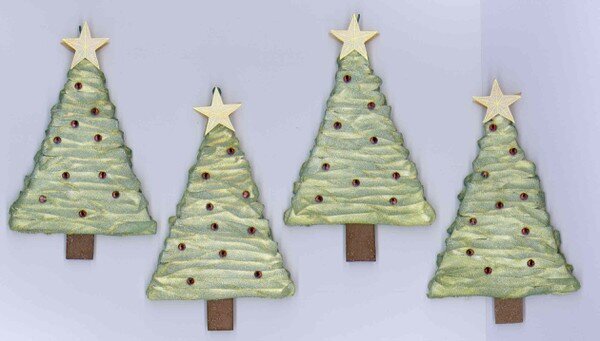
I made four of these trees for a swap. I had wished we had more participants in the swap, but by the time I had finished these trees, I was glad I was only making four! Actually, I have plans to make another one so it must not have been all that bad–just lots of steps.I made 8 trees (2 sides of four ornaments) following Jennifer McGuire's Holiday Thinking Inking class, Week 6. You can watch her make one on a video if you go to her class for Week 6. You can find a link on this thread: http://www.twopeasinabucket.com/mb.asp?cmd=display&thread_id=3030526. [twopeasinabucket.com] Here's what I did:TREE1. I attached a sheet of Ten Seconds Studio's Humungo Double-Sided Adhesive to a sheet of Bazzill 80-lb. cardstock in a color close to Shabby Shutters Distress Ink (just in case it showed through). I was hoping that this adhesive would work as well on paper and canvas as it does on metal!!)2. I cut out 4-inch high triangles for the trees and attached 1/2" strips of Sticky-Back Canvas turning them the way Jennifer demonstrates in her video. I secured the pieces to the back of the tree at the edges rather than try to stop and start in the middle of a row. I was amazed at how much canvas this project used. I weighted the trees down for a few hours to be sure the canvas adhered to the adhesive. 3. I used a blending tool to apply Shabby Shutters Distress Ink to the canvas, reinking it a couple of times, pushing ink into the canvas.4. I sprayed the inked canvas with a mixture of Perfect Pearl Perfect Pearls and water. Then I put the pieces in a wire basket next to a wall heater to dry.5. When the pieces were dry, I applied Peeled Paint Distress Ink for highlights. This time I did not push the ink into the canvas. I also added ink to the edges and overhanging canvas at the back of the trees. 6. I sprayed more Pearlized water (I wish I had used Patina Green Pearlized water to fill in the white areas.)7. When everything was dry, I attached Swarovski Flatback Crystals (Siam, SS16) with Crafter's Pick: The Ultimate Glue. Once again I weighted the trees down and walked away for a few hours.TREE TRUNK8. I cut strips of suede paper (It doesn't tear.) for the tree trunks and dabbed on Vintage Photo Stickles.9. I put strips of Grafix Dura-Lar (The Acetate Alternative) through a Xyron X and attached a piece to each trunk to add strength and stability. Then I used Sookwang Tape to put the two halves together. I trimmed them and used a blending tool to ink the edges.STAR10. I stamped a PSX star on sanded translucent Poly Shrink Plastic with Brilliance Pearlescent Yellow and let it dry. I cut it out and shrank it with a heat tool. I cut away the dots on the stamped image to make the star smaller. When I held it up, the design didn't show up much so I inked the back of the next star with Brilliance Galaxy Gold. That helped.ASSEMBLY11. I put Humungo tape on the back of one tree, pressing it into the canvas with a bone folder before removing the backing. 12. I removed the backing and added dark green, waxed linen cording (knotted to form a loop that could be used for a hanger). I added the tree trunk, and attached the other side of the tree.13. I attached the stars to both sides of the ornament with Crafter's Pick The Ultimate Glue. Yes, I weighted the whole thing down some more.14. I made a hangar by wrapping 20 gauge tin copper around two different sizes of paper stumps. Then I hammered them. (Hammering really does make a difference. The wire looks better and seems stronger after it has been hammered.) NOTE: The two halves of my tree came apart after a few days so I added another piece of Humungo to the other side of the tree and stuck it back together. I noticed right away that the bond was much stronger this way.TFL.Daria
No products have been added to this project.

Thanks for spreading positivity!