


Cheers
Be the first to cheer this project!
Give a Cheer
Be the first to cheer this project!

 Give a Cheer
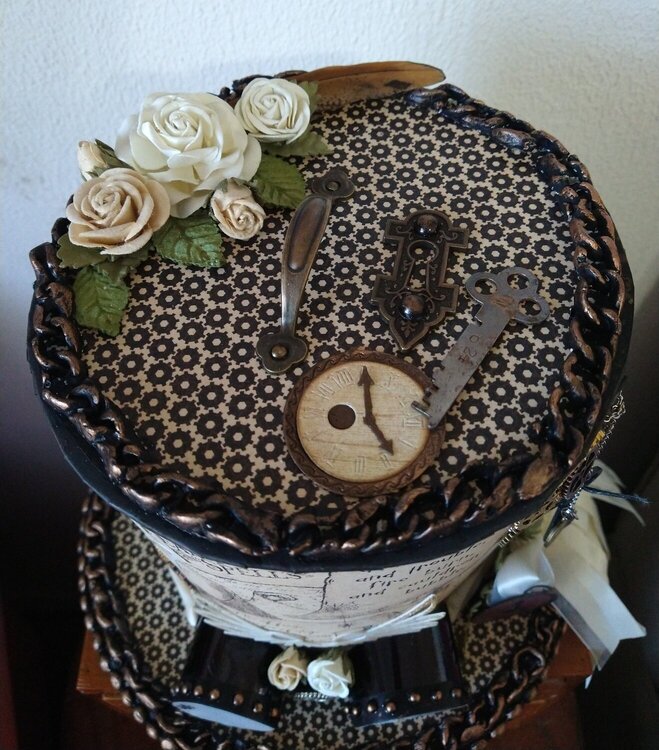
Inspiration: Paper Top Hat Tutorial: Steampunk Spells - by Kristine Woods
I thought I had done a great job of following directions; however, while photographing the hat I realized I forgot to measure the height of the hat going around so the rear is taller. LoL Also, when almost done, I realized that the brim of the hat was much thicker than in her video and I could not figure out what I had done incorrectly, unless it was just using the wrong type of cardboard. I added the ribbon, paint, chain links and beads to overcome the HUGE brim. I just kept adding to it until I forced myself to stop! This project took almost a week and the last three days was trying to fix the brim. At that point, it was do or die! :D She used toilet paper rolls to make the goggles and so did I but I changed the design after viewing one too many photos of what goggles looked like. I did not have black beads for the goggles, but I added some pearls, colored them black with my Copic 110 marker and then rubbed the metallic wax paste to make them look like metal studs.
Steampunk Spells paper, flowers, door handle, key hole, chipboard and metal clock charm: Graphic45
Spiderweb die: Queen & Company
DAS clay, Arteza acrylic paints, feathers, leaf, chain and bead molds, eyelets, chain and gears: Amazon
Light bulbs, steampunk wings and pocket watch die cuts: La-La Land Crafts
Pentart Metallic Wax Paste: MKWoodStudio at Etsy
Ribbon, beige, brown and black cardstock, metallic and acetate papers, vellum, pearls, keys and brads: my stash
Thanks for looking!
No products have been added to this project.

Thanks for spreading positivity!