


Cheers
Give a Cheer

 Give a Cheer
Weather is getting cooler here in South Texas, Christmas decorations are starting to appear in stores and Im ready to decorate my house. Im one of those that puts Christmas out the first weekend in November. This is truly my favorite time of the year and I like to enjoy it for a couple of months!
I was digging through my stash of Christmas/Winter and found these papers, ribbons, metal pieces, wood pieces, cabochons and a cute little moose. Using 2 tags from the chipboard tag album I made a couple of Christmas tags.
Snowman tag
I gathered some papers and embellishments I wanted to use on my tag. I wasnt sure if I would use them all, but wanted options as I worked on this
I glued the blue paper to the front of the tag, used an exacto knife to trim around and to get clean edges, I used a file. Next I tore and glued the snowflake paper paper to the bottom half of the tag. I trimmed with the exacto knife and filed the edges on bottom.
I wanted to add some dimension to the tag so I used sizzix crystal paste and a stencil to create the pattern on the tag. The crystal paste has a shimmer to it and I love how it gives a snowflake look.
While the paste was drying I used the bottom portion of the snowman shaker found here, Snowman shaker to trace out my snowman on the music paper. I inked the edges with stazon brown ink, I put a heavy layer on the edge so the snowman would stand out.
I grabbed a small piece of lace, tied a knot in the middle and glued it to the neck of the snowman to create a scarf. I then painted the wood snowflakes with white paint.
Next, I layered the metal circle, metal leaves, wood snowflakes and wood leaves to the bottom of the tag. I then glued the snowman to the top of the embellishments and used some foam squares on the face and hat portion of the snowman to make the snowman even after laying it on top of the embellishments.
Finally, I added some colored beads around the embellishments and the metal joy to the bottom portion of the snowman. I added silver stickles around the outside edge of the tag.
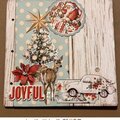
Tree tag
I glued the red paper, trimmed, filed (just like the snowman tag] then added the music paper the the bottom half of the tag and glued, trimmed, filed and then inked the entire tag.
I have this beautiful handmade green paper that I used to die cut out the tree with my sizzix. I decided to darken the tree a bit with some green ink.
I gathered a piece of lace and gold ribbon and layered them along the bottom of the tag.
I cut a piece of red and gold ribbon and tied a knot in the middle, glued it to the left side of the tag.Then, added the leaves and a poinsettia flower.
I glued the tree on top of the ribbons, added the clear cabochons, moose and joy. I wanted to add more gold, so I wound together some gold string and glued it under the flower.
I love how these tags turned out and I am ready to add them to my decor. I hope you have a wonderful crafty holiday.


Thanks for spreading positivity!


November 11, 2023